
Armytek Prime C1 Pro Review
General thoughts after a week of usage/size comparison/practicality/interesting things:
• This is my third ArmyTek flashlight, and one thing I’ve noticed is their outstanding attention to detail and solid design and construction of their lights. They really go all out. Comes with a 10 year warranty. It’s also rated at 10m drop/water resistant. The Prime C1 Pro has a premium feel, and it’s almost like I’m holding a precision tool rather than a flashlight. Armytek market this as a 3-in-1 EDC light, Bike/sports light, and keychain light.
• What’s included: 18350 cell, magnetic charger, spare o-rings, lanyard, instruction manual.
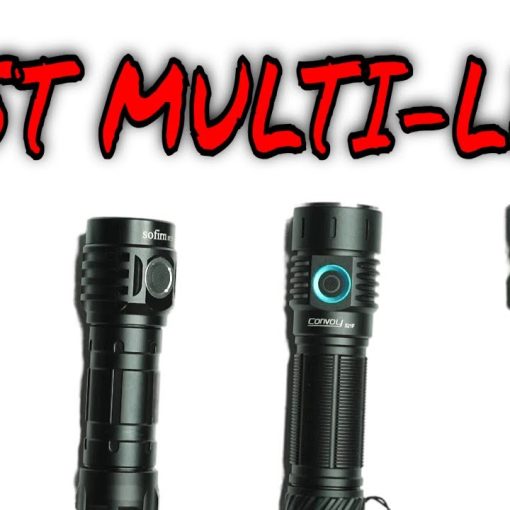
• Comparison with Warrior Nano, X0, X7, Speras M4
Overall Construction, LED, lens, bezel and reflector
• Armytek use a special kind of anodizing that I’ve never seen on other flashlights – it’s extremely durable, chalky matt black, and has some serious grip (have had my Doberman Pro rattling around with other lights in my bag, and it was the only one that didn’t get scratched up). Even with wet hands, the light still feels grippy. Machining is perfect, no rough spots or imperfections. No knurling on the battery tube but the head has some cutouts – one of which is used as the attachment point for the steel clip. It’s a very rigid and well designed clip – it’s also deep carry which I was pretty happy about. You can clip the light onto your hat as a makeshift headlamp or onto your bag strap.
• Magnetic charging contacts on the base of the light. The light is operated by a single, large side switch. It sticks out a fair bit, making it easy to find, but also requires a decent amount of force to activate. Normally I’m not a big fan of carrying around side switch lights in my pocket but I feel more confident with this one. The light also takes 16340/CR123 primaries.
• The bezel is made of stainless steel, TIR lens, Samsung LH351D LED. There is also anti-reflective glass sitting in front of the TIR lens – perfect! I even checked by trying to scratch it with a nail.
UI – modes
• Switching Uis
○ unscrew tailcap 1/4, press and hold the button, then screw it back in while holding the button. The light will turn on.
• General UI
○ Off state – click once to turn on last mode (memory)
○ Press and hold to cycle through firefly modes 1,2. Continue holding for main modes (LMH).
○ On state – click once to turn off.
○ Press and hold – cycle through main modes (LMH). It will cycle through firefly modes first if you had that on last.
○ Double click for turbo.
• Advanced UI
○ Off state – one click to turn on last mode (memory)
○ Press and hold to cycle through ALL modes: firefly 1 mode. Continue holding to cycle to firefly 2, 3, Main 1, Main 2, Main 3, Turbo. If you stop on one of the firefly, main or turbo modes – it will only then cycle through those modes when you hold down again. So think of the first holding down stage as the way to select a grouping (either firefly, main or turbo groupings)
○ On state – 1 click to turn off the light (it will remember the grouping you selected last)
○ Press and hold to continue cycle through that mode grouping.
○ Functions that work in On/off state:
§ Two clicks will bring you to the main mode grouping. I find this useful as you can then use single click from off to store the firefly grouping, then double click to access the main grouping. Double clicking while in the main groupings will toggle between the first (firefly) and second (main) grouping
○ 3 clicks – turbo. Hold to cycle turbo 1 and 2. The turbo setting you choose here will be remembered when you switch to the general or simple UI. This is important as you can decide whether you want the 1000 lumen turbo mode or a 350 lumen turbo to preserve battery.
○ 4 clicks – strobe mode – there’s three strobe modes. 1000 lumens @ 10 Hz, 1000 lumens @ 1 Hz and 100 lumens @ 1 Hz
• Indicator light – configure between three states (always on, on when in main modes and above, off in all states). Unscrew tailcap 1/4, hold button, then tighten and unscrew it to 1/4 again. This cycles between the three states.
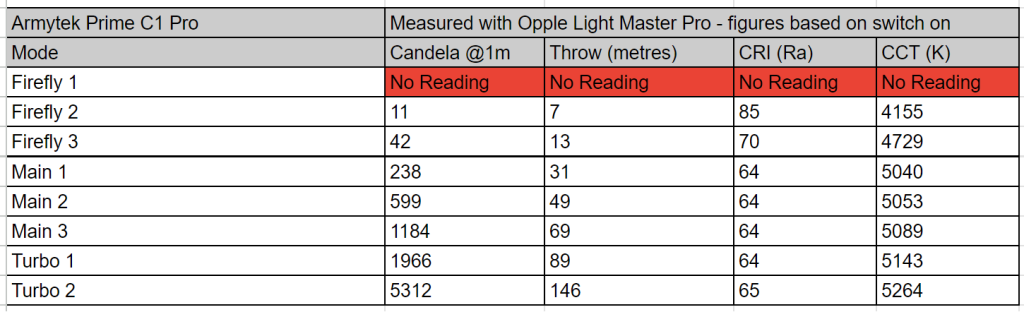
Performance – total output, beam profile, longevity, practicality
• CCT, CRI, Ceiling bounce test
• This is the perfect beam pattern for an EDC light – a decent amount of throw, large hotspot with decent amounts of spill.


Considerations
• The advanced UI mode is complicated, took me awhile to learn. But it allows you complete control with shortcuts. If I was only using 1-2 lights, I’d retain the UI easily. The good news is that the general mode is fairly simple. The manual just makes it seem more complex than it is.
• Clip touches the tailcap when unscrewing – not a big deal, just a bit annoying. A shorter clip would be better.
• Reduced runtimes with 18350 cell. Proprietary charging (no onboard charging), but will accept non-proprietary cells and CR123 primaries too. Removing onboard charging makes the light more durable, less susceptible to water/blunt force damage.
• An extension tube would’ve been fantastic – would increase runtimes 4x with 18650.
Verdict
This is one serious EDC. The amount of thought and attention to detail that went into this little light blows my mind. It’s overengineered. I don’t think I’ll ever use that advanced UI, but it’s good to know it’s there if I need it. This would be perfect if you’re looking for a great performing EDC light that’ll last you many years to come.