
Olight Seeker 4 Pro Flashlight Review: Worth Upgrading?
I reviewed the brand-new Olight Seeker 4 Pro! Olight has made some significant changes to this flashlight – watch my video to find out what they are before you buy one. Affiliate links below:
Link: TBC.
Please support my work and receive discounts by purchasing recommended products below. Affiliate links are below.
Flashlight Discount Codes (Master Spreadsheet) 👇👇👇
🔦🔦🔦 https://bit.ly/darrenyeo
My Amazon Store 👇
🔦 https://www.amazon.com/shop/watercolourmentor
Olight Seeker 4 Pro
General thoughts after a week of usage/size comparison/practicality/interesting things:
• So Olight has just released their Seeker 4 Pro, and I’ve been very impressed after using it for a few weeks. Compared to the previous Seeker 3 Pro, this version has done away with the proximity sensor, increased output of 4600 lumens and throw of 260m, and comes with a unique multi-function holster that also charges the light.
• What you get in the box.
• Comparison with other lights: E75, IF25A, Olight Warrior 3S
Overall Construction, LED, lens, bezel and reflector
• Aluminium construction, overall machining, and anodization are high quality. Anodizing is also grippier than on my Warrior 3s. Silicone grip around battery tube. Comfortable and grippy.
• Metal button with rotating switch, larger and grippier than the one on the Seeker 3 Pro – the clever design incorporates multiple tactical functions into one button. Can smooth ramp by rotating.
• Olight has confirmed with me that the LEDs are 4x Osram P9s. Quad TIR lens. Classic blue bezel accent with smoothed-down edges.
• The tail has a strong magnet and also is used for magnetic charging. Also compatible with the MCC3 magnetic charging cable.
• The light is charged through the multi-functional holster. The contacts are at the base of the holster and it accepts a USB-C connection. The light fits into the holster firmly and easily, and the clip on the back also makes it much easier to attach to your belt than other traditional nylon holster designs. Removing the light from the holster unlocks it automatically for quick activation.
• Battery can be removed from the rear and there is a spring in the head of the light.
UI – modes
• Auto lock after 30 seconds. Rotate the dial over 90 degrees or click and hold to turn on.
• Click + hold for moonlight. Repeat to cycle through steps 1-3. To access turbo (step 4) double press in any mode.
• While the light is off you can change the memorized brightness prior to switch on by rotating the dial.
• Timer: double press and hold (one blink = 3 mins, two blinks = 9 mins)
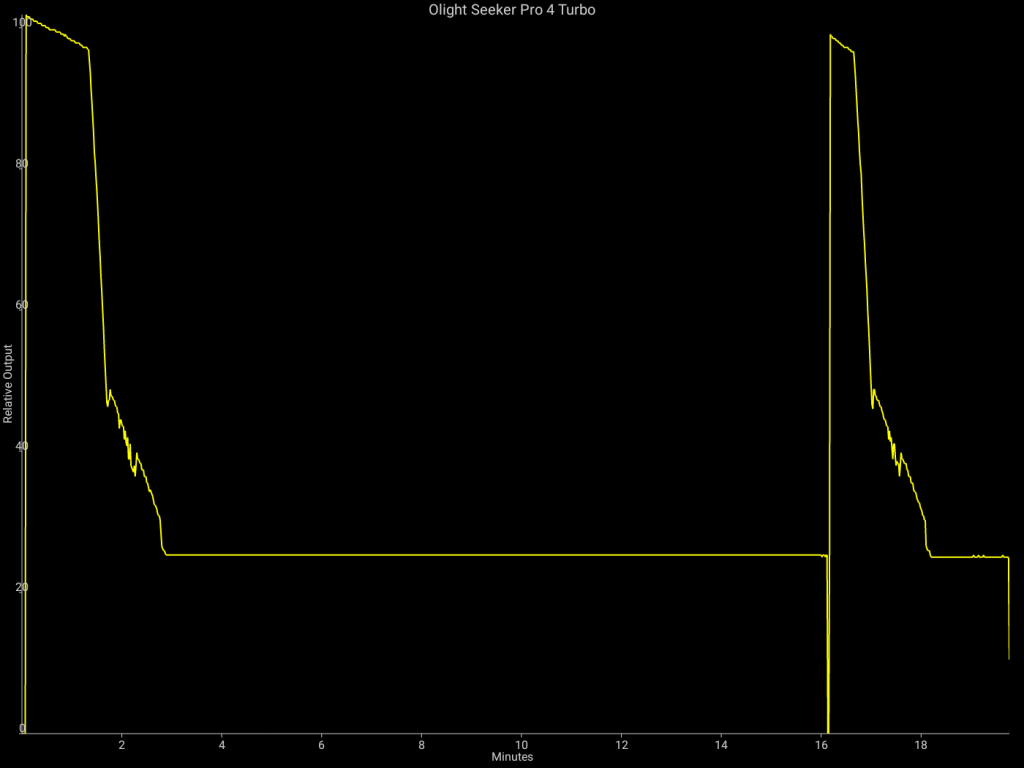
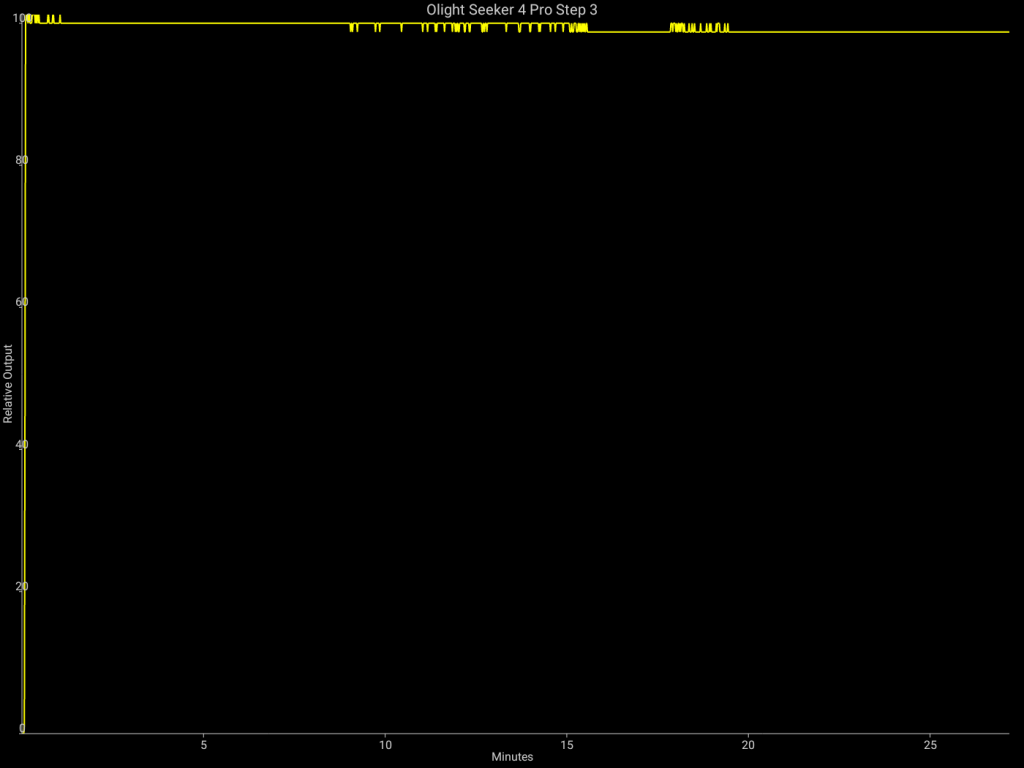
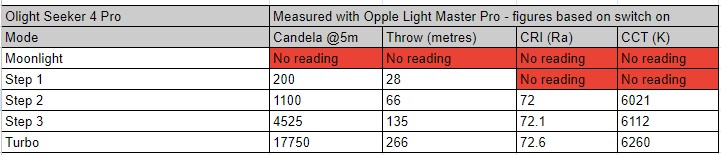
Performance – total output, beam profile, longevity, practicality
• CCT, CRI, Ceiling bounce test
• Bright, floody beam with surprisingly good throw
Considerations
• The auto-lock feature means the light will take longer to activate. However it’s a safety mechanism that works well with general-purpose lights like these, it’s not a tactical flashlight. In the holster, this is not an issue.
• Proprietary charging and battery.
• No clip!
• Light will lock you out of turbo after a few runs, but this will be better for the electronics/battery life.
Verdict
• Olight has addressed some limitations in the previous Seeker 3 Pro and has nailed it in this new model. I love the pure white tint of the beam, and special features like the axillary lights, rotating dial, and the multi-functional holster – everything is so easy to use and you can figure it out with the instruction manual. I recommend the Seeker 4 Pro if you’re looking for a top-performing general-purpose light with all the bells and whistles.
